 |
Segmented TurningDesign your first segmented project in 5 minutes with the Segmented Project Planner |
|||
|
| Products | Classes | Free Plans | Hints | Buy Now | Gallery | Wood Costs | User Projects | FAQ |
| Calculators(
AutoBowl,
Incline Angle, Volume) Color Picker Designers ( Diamonds, Segmented Scene, Vertical Spacers, Blocks, ZigZags, Diamond Borders, Slicer Open Segment) Design Tools (Describe-A-Shape, Design Assistant, Layer Tuner, Shape-A-Bowl, Sketch-A-Bowl) |
Document Generator Named Colors Project Resizer Reports (Project, Cut List, Turned Away, Turning) RingMaster Support |
Segment Designs/Mosaics Segment Images Segment Painting Template Printers (Rings, Segments, Angles) Videos ( Program Usage, Construction) |
The Segment Designer is a simple tool for creating designs you can "paint" into segments within projects. Assigning a Segment Design to a segment is performed just like you "paint" a segment; but, instead of a simple solid color, you are applying internal structure to the segment.
 |
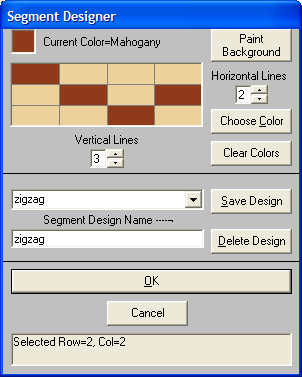
Here's a sample of the Segment Designer dialog that makes it all possible: A Segment Design consists of from 0 to 9 equally spaced horizontal and/or vertical lines; thus cutting a segment up into as many as 100 pieces. When you assign colors to the pieces, you can create very complicated designs that you can include in your projects. While your are creating a Segment Design, a sample is displayed so you can see what you are doing. In the picture above, you see a simple 5x5 design showing a slash of dark wood against a lighter wood background. You must save a Segment Design via the Save Design button to be able to use it in your project. Once created, it can be used in any project. As you scroll through the list of saved designs, they are previewed in the sample display area to make it easier to select the right one. When you print the report for a project containing Segment Designs, the individual pieces of each Segment Design are broken out by their color so you'll have all the cutting details of all segments, whether simple or compound. You assign colors to the pieces of a Segment Design just like you do in the main program display. Pick a color using the Color Picker (its always displayed automatically when the Segment Designer is displayed) and then right-click with the mouse in each square you want to color. A Current Color patch shows you what color is active at any given moment. As with the main display of your project, left-click with the mouse to pick up an already assigned color for use in painting other squares. |
Click here to get back to the Segmented Project Planner base page.
Still not convinced? Just give me a call at (805) 489-5309. I'll answer all your questions.
